Chicken burgers

20140309-213718.jpg

After weeks and weeks of nothing but grey skies and drizzle, we have finally had a sunny weekend. We spent the morning at the zoo (“Joe, what would you like to see at the zoo today?” “I want to sit in the bus and the car that move next to the merrygoround”) and the afternoon playing in our friends’ garden. As we sat in the car driving to our friends, my phone beeped. A text from my friend Steve:

Think I’m going to have a cigarette in the sun now I know the trophy doesn’t exist.

I felt a brief flicker of guilt. Steve is an ex-smoker. I hate smoking and sometimes I have to stop myself from saying “DisGUSting” out loud when I walk past someone smoking in the street. Steve stopped smoking three years ago, or maybe it’s closer to four, and when he told us he’d stopped (“like, properly, this time”) Jon and I were very proud of him and we told him that if he could stay cigarette free for a year, we would get him a trophy. Throughout that year, whenever we saw him, he would say things like, “how’s the trophy coming along?” or, “only 6/7/8 months til I get my trophy!” My Grandpa, who used to be a jeweller, still, at the age of 93, has his engraving machine and does engraving for golf club trophies and the like. I knew he would have a few trophies and he would engrave one for us for Steve. Unfortunately, when we asked him, he said he’d just got rid of most of his stock but he had one or two left and we could have one of those – a choice of a bird or a ball. Neither of these seemed particularly appropriate but we thought maybe we’d take the bird and think of something funny to engrave it with that would make the random bird into something super witty about smoking.

Well, Jon and I aren’t that witty because we’ve been trying to think of a funny line to engrave the bird trophy with for around three years and we still haven’t come up with anything (“I think that’s a bit unfair,” Jon interjected while reading this over my shoulder. “I could have thought of any number of witty things if the trophy had been better.”) Meanwhile, Steve has been smoke free for ages and the longer it gets the more deserving of a trophy he becomes and the more pathetic the bird trophy seems. At the same time, we’re starting to feel like it is the promise of a trophy that is keeping him smoke free and so we are genuinely concerned that if he gets the trophy he’ll celebrate with a cigarette. I’ve now told him this trophy can only legitimately be awarded posthumously, as only then can anyone say with certainty that he is no longer a smoker. The trophy is no longer significant as a tangible object, but has turned into a symbol of aspiration. Or something.

Poor Steve. If that story about the trophy didn’t make you think I’m a terrible friend then this one will: a couple of years ago, Steve announced he was becoming vegetarian. I know, smoking AND meat! What pleasures will he renounce next?! Clearly no trophies were going to be awarded by me for this crazy decision. However, like any supportive friend, when he told me this about 30 minutes before inviting himself for dinner I found something nutritious and hopefully delicious to eat.

A few weeks later, he was at our house again for dinner along with another friend. It was a Sunday evening and we’d been lazing around all afternoon and I didn’t feel like doing a lot of cooking but I wanted something really tasty and sort of junk food-ish but not unhealthy. The answer was, as it so often is to so many hungry moments: burgers. I didn’t have any beef mince and I wanted something healthier anyway, so I took out a pack of chicken mince. The secret to chicken burgers is to put loads and loads of seasoning and things because unlike beef burgers where you want to taste the meat, a chicken burger would just be incredibly bland on its own. I grilled the burgers, fried some onions and made some oven chips (invest in a crinkle cutter for potatoes. About £2 and it’s one of the best kitchen gadgets you’ll own) and served them up. Everyone ate in silence in that way that shows that the food is really being enjoyed and it wasn’t until I put my own knife and fork down that something dawned on me and I turned to Steve and said, “hey, aren’t you a vegetarian?” Steve, with chicken juice and ketchup dribbling down his chin said, “oh s/*^!…. ”

I did feel a tiny bit bad but I maintain that it should be the job of the vegetarian to remember that he is a vegetarian.

(I should add that this burger has been Steve’s only slip as a vegetarian and he has been fully non-meat-eating since then!)

  • 1 pound chicken mince
  • 1 large onion
  • 1 egg
  • Matzo meal (medium) or flour if you don’t have matzo meal
  • Light soy sauce
  • Cajun spice mix
  • Tabasco
  • Salt and pepper
  • A little oil (groundnut is best)

1. Finely dice the onion. Heat the oil in a frying pan and add the onion, cooking until it is soft and golden.
2. Put the onion in a large bowl with the meat, and mix. Add the egg, and around 50g of matzo meal – you want to get to a texture that looks like it will hold a shape.
3. Add lots of the seasoning listed. I usually include around 2 tablespoons of soy sauce, a large tablespoon of Cajun spice, and a teaspoon of Tabasco. Mix it all together thoroughly and then form into burgers. I find that this quantity of meat makes enough for 4 burgers, and it is easiest if you heap the mixture onto a sheet of clingfilm, wrap it and then squash it into shape. Refrigerate before cooking, if you have time.
4. Cook under a hot grill (or on a barbecue for even yummier results), flipping half way through so that it is blackened on each side.

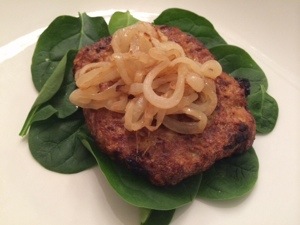
Good on its own, in a bun or pitta, or on a bed of leaves. Best served to a vegetarian.

*Approximate nutritional values (1 burger)*

  • Calories: 310 kcal
  • Carbs: 15.4g
  • Fat: 15.6g
  • Protein: 26.7g
  • Sugar: 6.8g
  • Sodium: 1864mg

*Baby-friendly version*

This is perfect for babies. Just remove the baby’s portion before adding the seasoning and add a little less or whatever your baby likes. For Joe I use a tiny bit of soy sauce (as it is so salty), and add tomato purée, and mustard powder.

Monkey Bread

When I started this blog, I thought it would be all about family-friendly recipes that could be knocked up in a few minutes, and enjoyed by the whole family, small babies included. So far, that hasn’t really happened – I’ve found it hard to resist including recipes for chocolate mousse, cakes, brownies, etc and some other things that aren’t particularly quick or family friendly. I think that this is because, while my main cooking task is to make healthy delicious meals everyday for me, Jon and Joe, I can’t just do that, and I also want to experiment and try random new things, even if they ultimately turn out to be pointless.

Pointless. What is a pointless recipe? As long as it tastes OK and fills a hole, then how can a recipe be pointless? That is what I thought, until I made Monkey Bread. It’s not that it doesn’t taste nice – it does. It’s not that it’s difficult – it’s not. It’s just that I can’t quite see why anyone invented this food and what purpose it serves in the general culinary canon.

Monkey Bread is (of course) an American invention. Essentially, it is a “tear’n’share” bread, made from balls of dough stuck together. In its original form, it is sugary and cinammony and buttery, but I made its less common savoury sister, using olive oil and herbs. I love cinammon, but I feel like it is an overused spice in the US. When I was in DC, I felt like the months of September to January were shrouded in a cloud of cinammon – as you walked part the pumpkins outside Whole Foods, as you stepped into Starbucks with their red “Christmas” cups – it was like they pumped cinammon through the air vents everywhere to give you a warm, autumnal and festive sense. It sort of worked, but it also made you feel like you were being played, very obviously, by these big consumer giants, into believing that you were skipping merrily through autumn leaves into your village market to exchange silver coins for fresh marrows grown on your neighbour’s farm. Also, I can’t think of any particular place for a sweet, cinammony bread at my table so I thought that at least the savoury one would be something to snack on with our meals. Obviously all the recipes I saw for savoury monkey bread involved cheese, so that is definitely something you can do, but clearly not what I would do. Pointless as this bread is, the cool thing about it is that you can do anything you want to it, flavour-wise.

The picture you see above is attempt number two. We first tried this the week before, and I was running late so I sent Jon an email with the ingredients and told him to stick it all in the Kitchen Aid and make a dough, and then put it into a greased bowl to rise. I got home to find that he’d done it and dilligently sought out the warmest place in the house to let the dough rise, i.e. by the boiler. What he hadn’t done was added anything to the dough that would make it rise. This was because I’d forgotten to include yeast in the list of ingredients. Jon said, “Yes! I noticed that and thought it was funny that there was no yeast. But then I thought, perhaps there’s something else in here that would cause it to rise magically!” A+ to Jon for noticing the lack of yeast and considering its effect on the rising. B+ to Jon for thinking that there may be a magical ingredient in the dough. F to me for forgetting to include the yeast in the recipe. (We’ve made this mistake with bread before, by the way – about two weeks after Joe was born I made a bread with no yeast or salt, which unsurprisingly turned out to be a small baked rock).

So – what are the advantages of this bread? It’s quick and easy to make without any special equipment (though if you have an electric mixer it takes a lot of the pain out of kneading). Depending on what you put on it, it can certainly be a good bread for babies as it’s easy to eat and tasty. It would also be a fun thing to make with children, who would probably love rolling the dough into balls and squishing them together. If you’re having a dinner party and you want bread to be part of it (maybe to go with soup), then this would look cool on the table and it’s fun that everyone can just reach over and pull a piece off (which always looks a bit animal-like if it’s done on a normal loaf of bread).

Give this a try. But don’t be surprised if, after you’ve made it, you think, WHY?

  • 450g bread flour (you can use a combination of different flours, but make sure that at least 300g is strong white flour. We did 350g white and 100g rye)
  • 1.5 tsp salt
  • 1 packet of dry yeast
  • 250ml warm water
  • 2 tablespoons olive oil
  • 1 egg
  • Herbs, spices, etc of your choice, plus more olive oil or melted butter or whatever you choose. We used olive oil and fresh thyme, since that was what we had, but garlic and rosemary would be nice, and so would caramelised onions. You could also use grated cheese – I think you would need about 50g grated cheese.
  1. Combine the dry ingredients in a large bowl or the bowl of your electric mixer.
  2. Combine the wet ingredients in a smaller bowl, and then add to the dry ingredients. Mix with your hands, or beat with the electric mixer. Add more flour if necessary to get to the desired consistency, which is a smooth, soft, elastic dough.
  3. If doing by hand, knead for around 10 minutes. Alternatively, use the dough hook of the mixer and keep it on low for 10 minutes.
  4. Lightly oil a big bowl (which should allow the dough to rise to around double its size) and put the dough in it. Grease a piece of clingfilm and cover the bowl tightly, and then put the bowl somewhere warm.
  5. If you don’t have anywhere warm in your house, then you can put a small saucepan of water on the hob, bring it to a simmer, then turn off and put your bowl on top of that.
  6. Allow the dough to rise to double its size – it can take 30-60 minutes for this to happen.
  7. In a small bowl, combine the extra olive oil, herbs, cheese or whatever you want.
  8. Prepare your baking dish. You could use a cake tin, or a glass dish, or anything you like. I used a glass dish which had a base of about 18 cm)
  9. Divide your dough into 32 pieces, and roll each into a ball. (I did half the dough, then half again, then half again, then half again – but I’m sure you worked that out for yourself.)
  10. Dip each ball into the bowl of oil and herbs, and then place it in the dish, forming a layer of balls all squished next to each other, and then on top of each other.
  11. Cover the dish with the greased clingfilm, and leave it to rise again in a warm place for another 20 to 30 minutes.
  12. Pre-heat the oven to 180C/350F.
  13. Put in the oven and bake for around 35 mins, or until golden brown.

*Approximate nutritional values (1 “ball”)*

  • Calories: 63.5kcal
  • Carbs: 9.5g
  • Fat: 2g
  • Protein: 1.75g
  • Sugar: 0.2g
  • Sodium: 86.3mg

Azuki bean risotto


I have a bit of an obsession with protein. I’m not sure when it started or why, but the idea of a meal without protein makes me nervous. Obviously when I make something with meat or fish this is no problem, but when I make vegetarian meals it’s sometimes more of a challenge. Often when I trawl the internet at about 4pm in search of dinner inspiration, and click on “vegetarian” on a recipe website, I find things that are little more than side dishes in large portions, or a pile of vegetables beefed up into a main course because it has cheese dolloped on top. I’ll save my anti-cheese ranting for another time, but suffice to say that I do not consider cheese to be an acceptable addition to a meal (I wouldn’t eat it myself but I can accept a cheese course, or possibly a small amount of cheese added to certain foods as a seasoning). Anyway, I’ve got lots of recipes for lentils and chickpeas and so on that are all excellent, but I have searched for a long time for protein-rich but dairy-free risotto recipe.

Before you get all “how can you not have cheese in a risotto” on me, can I just point you to a random website I found which quotes a possibly famous Italian chef as saying never to use butter or cheese or cream in a risotto, but to only use olive oil. And even Jamie Oliver says you should never mix cheese with fish in a risotto or pasta, so clearly cheese is not an essential risotto ingredient.

I’ve made risotto with chicken before (chicken and mushrooms) but it felt a bit like a delicious mushroom risotto with irrelevant pieces of chicken in it. I’ve considered making risotto using chickpeas or other beans, but although I love chickpeas I think the texture would be too incongruous in a risotto, and I don’t really like most beans because they taste too… beany. 

So how did I come to make a risotto with beans? Like this: in our house, Jon does the shopping. I think about what I want to make for supper for the next few nights, mentally assess what ingredients we already have and then email a shopping list to Jon, who goes to Waitrose on his way home. When he gets in I eagerly unpack the shopping and say things like, “I asked for 6 onions, why did you only buy 3?” and he replies, “Because we already had 3”, to which I say, “But I factored those 3 into my calculation of how many onions we needed! Don’t second-guess my shopping list!” But then he points out the 4 gradually deteriorating bags of fresh mint in the fridge and I am forced to accept that my amazing capacity to remember exactly what we have in stock at any given moment may not be quite so amazing after all. 

That aside, his shopping skills are excellent, but sometimes he comes home with random ingredients and wants them incorporated into some meal that I had already planned. Last week I asked him to buy broad beans because I wanted to make a risotto with them and other green things (as a starter – protein less essential). He did return with broad beans, but also with a can of azuki beans, because he’d read the nutritional values of all the different beans written on the cans and determined that azuki beans had the highest amount of protein and were, as proclaimed by the packaging on the can, a superfood. Yes, my protein obsession has rubbed off on Jon. Yes, in typical male fashion, he has taken it to another level.

So I put the can of azuki beans in the cupboard and promised to find something to do with them. After a bit of internet research, I discovered that (a) they are also called adzuki or aduki or adjuki beans; and (b) they are used mostly in Asian cuisine and usually made into red bean paste, which is sweet and used in Chinese confectionary. I didn’t want to make anything sweet so after sifting through a few cookbooks and more websites, I came across a quite appealing spicy azuki bean risotto recipe. I made a few changes to it when I made it, one of the most important being that I adopted Delia’s technique of shoving the risotto in the oven to cook, rather than standing over the pan stirring. I think if I had to do that I would never make risotto, but the oven baked technique works really well, and the fact that you don’t have to slave over the pan for 30 minutes makes you enjoy it all the more. In fact, with that change, this meal became one of the quickest and easiest to make, and it’s all in one pot! 

I really liked this risotto, which should possibly be categorised as “Asian fusion”, because it is risotto in texture but Asian in taste. Most of all I enjoyed the protein-richness of it, and the non-beany taste. In fact, the beans were the least beany I’ve ever had, so if you think you don’t really like beans, try this anyway. It’s really good.

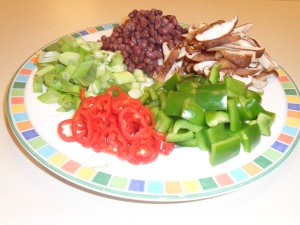
  • 1 can azuki beans
  • 500 ml vegetable stock
  • 2 tsp rapeseed or other vegetable oil
  • 1 tsp toasted sesame oil
  • 1 onion, diced
  • 4 spring onions, sliced (white and half the green parts)
  • 1 box shiitake or other mushrooms, sliced
  • 1 green pepper, seeded and diced
  • 2 red chillis, seeded and cut into rings
  • 6 fl oz carnaroli or other risotto rice
  • 75 ml dry white wine
  • 1 tbsp soy sauce
  • 1 tbsp sesame seeds (optional)
  1. Prepare the vegetable stock.
  2. In a large saucepan that can go in the oven, heat the oil over medium heat. When hot, toss in the onion and the white parts of the spring onions, and stir for a couple of minutes until the onions start to go translucent.
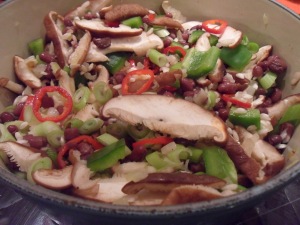
  3. Add in the green pepper, chilli and mushrooms and saute for about 5 minutes until they begin to soften.
  4. Turn the heat down to medium-low. Add the rice and stir gently to coat the grains with oil.
  5. Drain and rinse the azuki beans, and then add them and the rest of the spring onions.
  6. Pour in all stock, wine and soy sauce, stir to make sure all the rice and vegetables are submerged.
  7. Cover and put the pan in the oven for 20 minutes. Remove, stir and replace for another 15 to 20 minutes.
  8. Serve immediately, garnishing with sesame seeds if desired.

I think this dish is a little too spicy and salty for Joe as it comes, so the baby-friendly version goes like this:

  1. Have another, smaller pan on hand.
  2. Use low sodium or salt free vegetable stock.
  3. Follow steps 1 to 5 as above, but without the chillis (or using fewer)
  4. Before step 6, remove from the pan your baby’s portion and put into the smaller pan.
  5. Add the chillis to the main pan and continue stirring.
  6. Add enough stock to the smaller pan to fully cover all the rice and vegetables.
  7. Add the remaining stock, wine and soy sauce to the main pan together with some salt if you used salt free stock.
  8. The smaller pan cooks in the oven in the same way, but you may want to monitor more closely how it is cooking and, if necessary, add more liquid during the process because it is hard to be precise about the liquid when separating the risotto like this.

*Approximate nutritional values (adult portion)*

  • Calories: 390 kcal
  • Carbs: 68g
  • Fat: 6g
  • Protein: 12g
  • Sugar: 9g
  • Sodium: 726mg

Easiest Japanese Chicken

20120815-002914.jpg

I’m sorry to say that I’m going to go against the stated purpose of this blog in my very first post, because although this meal is very quick and easy, it’s not really very baby friendly, as it’s pretty salty. After Joe turned 1 (the very moment the clock struck midnight on his birthday, because that’s when his entire digestive system changed of course) I became a bit more relaxed about salt quantities and even *gasp* a little bit of sugar now and then. I did try making him something using soy sauce – I think it was sea bass – but he wasn’t a big fan, so I’m not going to give him this meal just yet.

This is a recipe that I found on a facebook group, and everyone raved about it. I ignored it for a while because I often find that things other people rave about on facebook groups are not things I love (like in the facebook book group I’m in… I pretty much hate all the books everyone recommends. I should probably leave that group), but then I actually read the recipe and thought: it’s basically chicken in soy sauce, what’s not to like? So I made it, and lo, it was good!

One of the best things about this recipe is that you just chuck all the stuff into a pot, and leave it for about 30 to 40 mins. This means you have 30 to 40 mins to do some work, maybe an exercise DVD, or maybe just play a few rounds of Ruzzle.

Lightly adapted from Food.com

  • Chicken for 4 – best with dark meat, such as drumsticks or thighs (with bone) but works with chicken breast too
  • 1 cup water
  • ½ cup balsamic vinegar
  • ½ cup soy sauce
  • 1 tbsp honey
  • 1 garlic clove, crushed
  • 1 small red pepper, slit open, seeds removed, minced

Apologies for the American cup measurements – I actually have a set of American cups that I use for this, but if you don’t, then 1 cup is about 240ml.

1. Place all the ingredients in a saucepan over a high heat.

2. Bring to the boil, then reduce to a simmer for about 20 minutes. If using chicken breasts, then remove when they are cooked – approx 15 minutes, and replace at the end.

3. Remove any scum that rises to the surface.

4. Increase the heat, turning the drumsticks frequently in the liquid, and cook until the liquid has reduced to a sticky glaze. If using chicken breasts, put back in when the liquid gets to this point and make sure they are heated through.

5. Arrange the chicken on a plate and spoon the glaze over.

NOTE It’s a glaze rather than a sauce, so there’s not a whole lot of it.

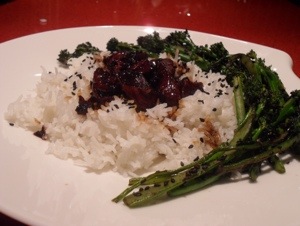
We had this with steamed basmati rice and stir fried tenderstem broccoli with toasted sesame seeds. Yum. I did a pilates DVD and played 4 games of Ruzzle loads of work while it cooked.

*Approximate nutritional values*

Chicken alone

Calories: 243 kcal
Carbs: 20g
Fat: 4g
Protein: 28g
Sugar: 14g
Sodium: 3781mg

Chicken with rice and broccoli

Calories: 588 kcal
Carbs: 87g
Fat: 10g
Protein: 36g
Sugar: 15g
Sodium: 3781g